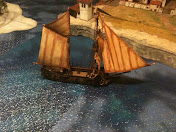
Tutorial for making polystyrene sails.
Why Polystyrene?
Sails on a model ship for gaming need to have the following qualities:
- Moisture resistant.
- Durable and damage resistant.
- easily repairable at or between games.
- readily available material.
- Takes paint and stain well.
- Light enough to not pull down spars and rigging.
Materials needed:
- Polystyrene sheets: .005" or .13mm thick. (Evergreen scale Models, stock # 9009.)
- Polystyrene Strips: .010 X .030 X 14 inches (Evergreen scale Models, stock #6-101)
- Polystyrene Strips: .010 X .188 X 14 inches (Evergreen scale Models, stock #6-108)
https://evergreenscalemodels.com/ - CA Glue & Accelerator (Zip-Kicker)
- Scissors
- Ruler (Metric or Imperial, no preference)
- Micro- hole Punch 1/16th inch8. Brass Strip or Floral wire if brass strip is unavailable.
This Stuff is getting harder to find, floral wire can also be used. Sail Plans

Original from EcoClipper.org
Building Sails
(read through before you begin)
Sails should be custom cut to your mast and yards. Guidelines: for Square rigging the top of sail is slightly shorter than spar above it and bottom of sail slightly shorter than spar below it. If it is the course sail, the one right above the deck, keep in mind the gunwales, the sails should just touch or hardly touch the tops of the rails. Use Ruler to draw guide lines to mark the center of the sail and the sail edges so you can trim the sail to shape.
Center of sail clearly marked .The Mizzen may be a Spanker like a Sloop or a lateen style like on a galleon. Either way cut to shape and preference. Sail Seams
The front of the sail will use the Polystyrene Strips: .010 X .188 X 14 inches. Line the perimeter of the sail edge with the strips and place one in the center over the center line drawn in the previous step.
 |
| Running a line of Glue on the back of the strip can be tricky, best to mark lines evenly with a pencil on the sail. Then run a line of glue on the pencil mark. |
 | |
| Trim off overlapping strips. |
 | |
| This is one of the possible patterns for the square sail. |
Flip Sail Over when dry.
Using the .010 X .030 X 14 inches Strips, glue to the back of the sail in the same pattern as the strips on the front. making sure to glue down two pieces of brass as in the picture above. The brass will be slightly bent to give the illusion of the sails being filled with wind. Don't bend the brass until the sail is Primed, painted, and or stained and secured to the Yard Arms. It is not unusual to have to re-glue as you adjust the brass bars. They may pop off.

Back of lateen Sail

Front of lateen sail


In this picture there is no brass on the lateen sail. On this model I will not put brass on this sail to create a bulge. I'm doing this to save on the use of brass, I will be tying off the sail with dead eyes to get the same effect. Brass or wire on the lateen sail if used, should be only run along the bottom.
Let dry.

Back side of the square sale first three holes. Notice it is above the .010 X .030 X 14 inches
Polystyrene Strips. This helps to stop ripping of the sale.

Top of sale complete. Fewer holes can be used, More holes just insures it stays tight to the Yard arm.

Two holes should be placed in the bottom corners to secure the sails from bellow.

Back side of the square sale first three holes. Notice it is above the .010 X .030 X 14 inches
Polystyrene Strips. This helps to stop ripping of the sale.

Top of sale complete. Fewer holes can be used, More holes just insures it stays tight to the Yard arm.

Two holes should be placed in the bottom corners to secure the sails from bellow.
 |
| Lateen Front |
 |
| Lateen Back |
Sanding the sail
It is important to lightly sand the surface of the polystyrene sail. first it gives the primer coat more to stick to. Second it gives a texture that looks a little more like canvas. Last it takes a little of the rigidity out of the sail and it acts a little more like cloth than plastic. It barely shows up in the picture but it puts some abrasions on the surface. Don't sand to the point it seems thinner than other parts of the sail! some primer will literally warp the sail once it dries if the plastic is too thin.
Priming the Sail
 |
| Back Side, Before Primer |
 |
| Back side after Prime. Covers brass completely. |


